Data Validation
Vana uses a Proof of Contribution system to validate data submitted to the network. "Valid" means something different in each DataDAO, because different DataDAOs value data differently.
Running Proof-of-Contribution in the Satya Network
The recommended way of validating data securely in the Vana Network is by using the Satya Network (also known as Data Validators Network), a group of highly confidential nodes that run on special hardware. At a high level, the data contributor adds unverified data, and requests a proof-of-contribution job from the Satya Validators (and pay a small fee to have their data validated). Once validated, the Satya validator will write the proof on chain.
Proof-of-Contribution Template
To run PoC in the Satya Network, a DataDAO builder must implement a simple proof-of-contribution function using this template.
PoC Template
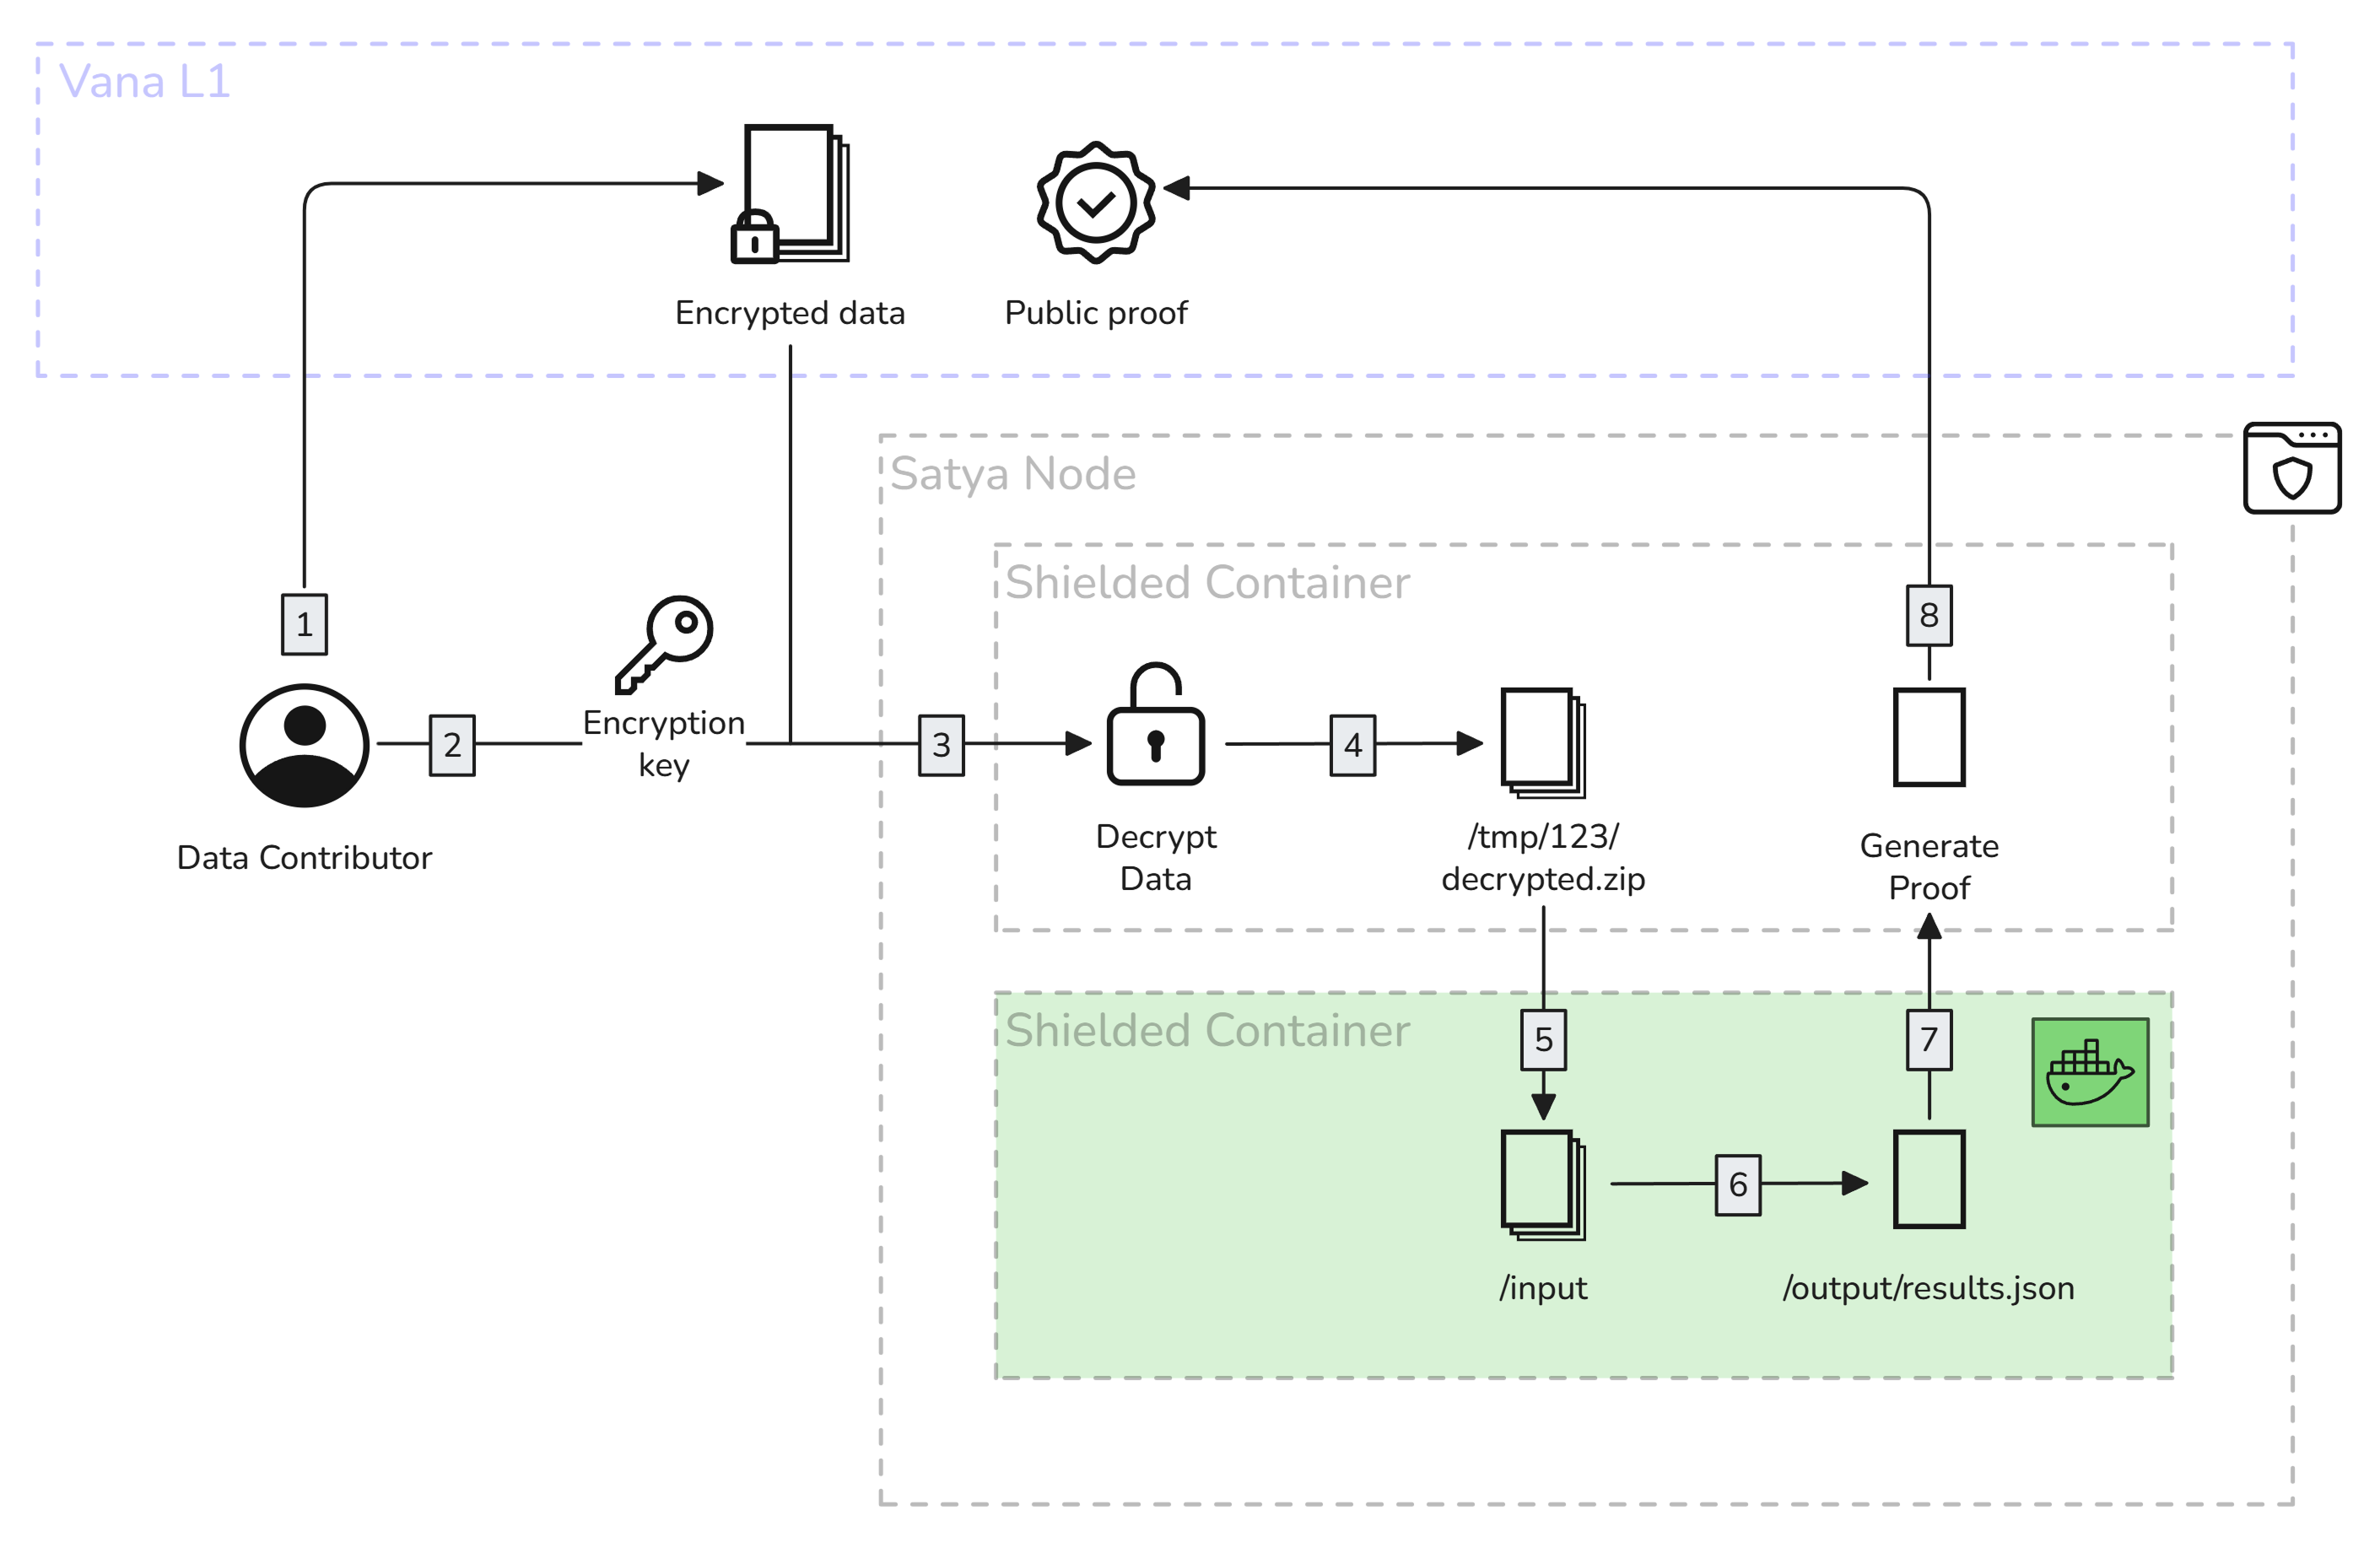
The diagram below explains how this PoC template works.

Proof-of-contribution running in a Satya node
- The data contributor adds their encrypted data onchain, via the Data Registry.
- They request a validation job, paying a small fee. Once a Satya node is available to run the job, they connect directly to the node, and send them the encryption key and the proof-of-contribution docker image that needs to run on the data to validate it.
- The Satya node receives the key, and downloads the encrypted file, and decrypts it
- The Satya node places the decrypted file in a temporary, trusted* location within the TDX environment. The node operator cannot see the contents of this location.
- The Satya node downloads and initializes a docker container to run the specified proof-of-contribution, and mounts the input and output volumes. The PoC container will have access to the decrypted file.
- The PoC container runs its validations on the decrypted data, and outputs the attestation. More information on data attestation can be found here: Data Attestation.
- The Satya node reads the output, and generates the proof.
- The Satya node writes the proof onchain, and claims the fee as a reward for completing that work.
NoteA TDX-protected container runs in Intel's Trust Domain Extensions environment, which provides hardware-level isolation and memory encryption. This represents an evolution from the previous SGX-based approach, offering improved performance and scalability while maintaining strong security guarantees.
Satya Network Integration
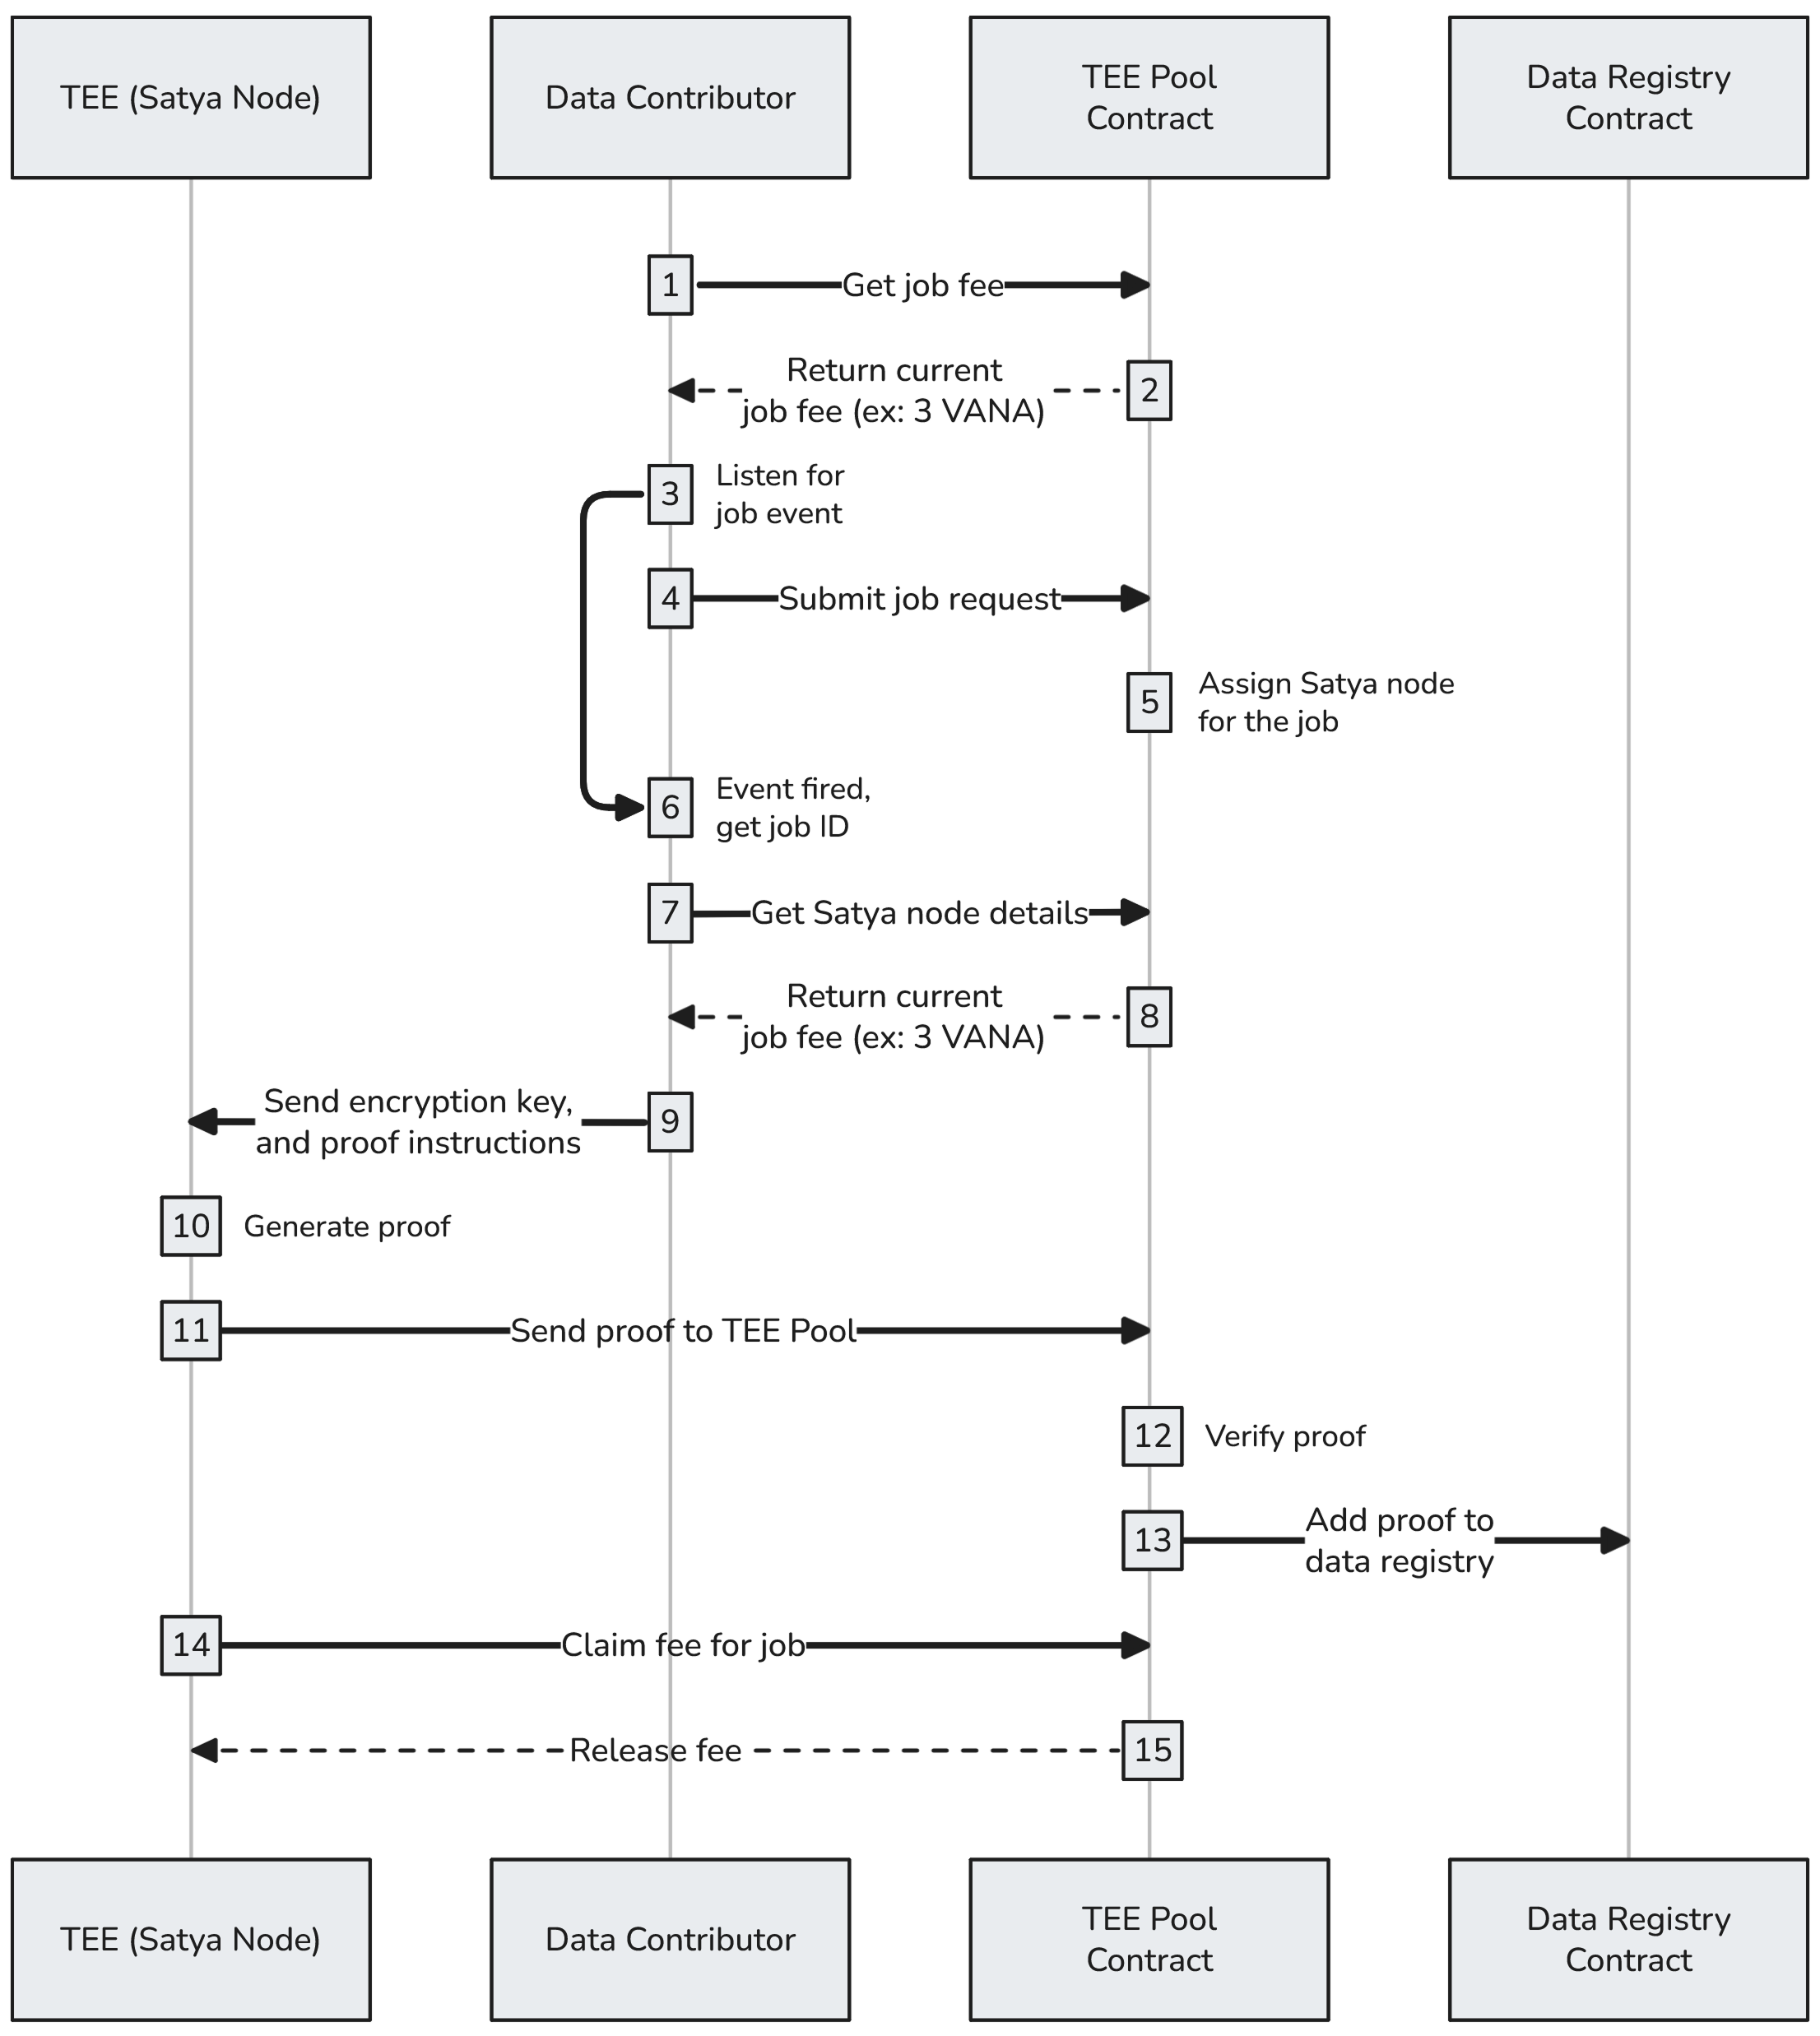
Once a data contributor has uploaded their encrypted file to the Data Registry, it's time to run a proof of contribution job to validate it. The steps below show how to use the Satya Network to validate it.

Using a Satya node to run proof-of-contribution
- Each validation job requires a small fee (which changes based on load). The data contributor can get the current fee by calling
teeFee()on theTEE Pool Contract. - The current job fee is returned: ex:
job_fee = 0.01 VANA. - The DataDAO UI now attaches a listener to listen for
JobSubmittedevents from the TEE Pool contract, which emits when the job is successfully submitted. - The DataDAO UI submits the job request to the TEE Pool to get the data contributor's file validated:
requestContributionProof(file_id, { value: job_fee }). - The TEE Pool assigns a Satya node to handle the job, and the
JobSubmittedevent is fired. - The DataDAO UI receives the JobSubmitted event, and gets the corresponding
job_id. - The DataDAO UI gets the details of the Satya node assigned to the job by calling the TEE Pool's
jobTee(job_id). - The TEE Pool returns the address of a Satya node, so the UI can connect to it directly: ex: .
- The DataDAO UI sends a
/RunProofrequest to the Satya node to begin the validation. It includes the encryption key used by the Satya node to decrypt the file, along with the URL of the proof-of-contribution docker image that will be run to generate the attestation. More information about the request below. - The Satya node downloads the encrypted data, decrypts it, and spins up the proof-of-contribution container, which validates the data and generates a result. It then builds the attestation according to the Data Attestation schema, and the proof is uploaded to IPFS.
- The Satya node sends the proof to the TEE Pool.
- The TEE Pool contract verifies the proof.
- The TEE Pool adds the proof to the data registry.
- The Satya node claims the
job_feefor completing the job. - The TEE Pool releases the
job_fee.
NoteThe Satya Network is continuously evolving with the latest in confidential computing technology. The recent transition to Intel TDX provides enhanced performance and scalability while maintaining the security guarantees of hardware-based trusted execution. Do not send sensitive information to the Satya nodes while in testnet.
Running Proofs on a Satya Node
POST /RunProof
Once a Satya node has been selected to run the proof-of-contribution for a data point, the data contributor can talk to that node directly.
Headers
| Name | Value |
|---|---|
| Content-Type | application/json |
Body
| Name | Type | Required | Description |
|---|---|---|---|
file_id | number | true | File ID from the Data Registry |
job_id | number | true | Job ID sent by the JobSubmitted event |
encryption_key | string | true (if encrypted_encryption_key isn't provided) | The symmetric key used to decrypt the file (a wallet signature like 0x1234...) |
encrypted_encryption_key | string | true (if encryption_key isn't provided) | The symmetric key used to decrypt the file (a wallet signature like 0x1234...), but encrypted with the Satya node's public key |
encryption_seed | string | true | The message that was signed to generate the encryption_key |
proof_url | string | true | The proof-of-contribution docker image URL, ex: https://github.com/vana-com/vana-satya-proof-template/releases/download/v22/gsc-my-proof-22.tar.gz |
env_vars | object | false | Any environment variables that get passed into the proof-of-contribution container as key/value pairs |
secrets | object | false | Any sensitive environment variables that get passed into the proof-of-contribution container as key/value pairs, encrypted using the process below. These secrets are only decryptable by a registered Satya node. |
nonce | number | false | A random number that will be signed and returned in the response, useful for checking the Satya node's wallet address. |
validate_permissions | object | false | When permission is granted to a file to a party, the encryption key is encrypted with the party's public key and then written to the Data Registry. To verify if the permission granted is accurate, send the details of how the encryption key was encrypted. The Satya node will encrypt the encryption key in the same way, and verify that the permission was accurate. |
Sample Request
{
  "job_id": 114815,
  "file_id": 553343,
  "nonce": "1234",
  "proof_url": "https://github.com/vana-com/vana-satya-proof-template/releases/download/v24/gsc-my-proof-24.tar.gz",
  "encryption_seed": "Please sign to retrieve your encryption key",
  "env_vars": {
    "USER_EMAIL": "[email protected]"
  },
  "validate_permissions": [
    {
      "address": "0x0161DFbf70a912668dd1B4365b43c1348e8bD3ab",
      "public_key": "0x075d4a19477220b15b2a955f12dde68ea8811b5500608f76872b88ab494148de49bbac535eb9316a4866225cd073e5f793a93eca718e3749c87d2eb7f9360a85",
      "iv": "8163c393101b852b86ecd9a29f136962",
      "ephemeral_key": "d260671b646f15d4c6a6a954468cb68f269059b933ad80c8194eb52570469ad4"
    }
  ],
  "encrypted_encryption_key": "8163c393101b852b86ecd9a29f1369620442fa291608ec3dddef61e076ace5d4c27ec84abcc96944b4050c3cce5a3962bac7b083c17af840c086fdf3fee011b2a1ba136215da0ab0e72e18fe2a36bc5020f58edd29cb29ea0134a62aad94b0fb74db54d1904a6e0b7260ee6ae224d8682f15b3a54698a9fb358a950a3411d00a12f3ea49774c08e16649512e0bb838ab71cd4c3622be61c9329569fbebe42af4588db0bc51b654efced6f40d54d6c9b9a95bdfe31e168d6492475dd0eb17ebb6aac753c366acd09aae7aa4f667c8e85293ae8c55f8c11445524c1780c5a33582b5b00f2db5dad628461da3e7ee0152000f5e6144ee068e26371c9ea49a93610481"
}
Response
On success, returns a JSON object containing:
| Name | Type | Description |
|---|---|---|
job_id | number | The ID of the job that was processed |
file_id | number | The ID of the file that was validated |
exit_code | number | Exit code from the container execution |
ipfs_proof_url | string | Direct URL to access the proof on IPFS gateway |
proof | object | The complete proof object that was uploaded to IPFS |
logs | string | Container execution logs (only available in testnet) |
signed_nonce | string | If a nonce was provided in the request, it will be signed and returned |
Example Success Response
{
  "job_id": 123456,
  "file_id": 789012,
  "exit_code": 0,
  "ipfs_proof_url": "https://ipfs.vana.org/ipfs/QmeXfigTXq8D5WfM9UQzNHH5iNxayS1kKPGJPbf3YL4YZi",
  "proof": {
    "signed_fields": {
      "subject": {
        "file_id": 789012,
        "url": "https://example.com/file.json",
        "owner_address": "0x...",
        "decrypted_file_checksum": "...",
        "encrypted_file_checksum": "...",
        "encryption_seed": "..."
      },
      "prover": {
        "type": "satya",
        "address": "0x...",
        "url": "..."
      },
      "proof": {
        "image_url": "...",
        "created_at": 1234567890,
        "duration": 10.5,
        "dlp_id": 123,
        "valid": true,
        "score": 0.85,
        "authenticity": 1.0,
        "ownership": 1.0,
        "quality": 1.0,
        "uniqueness": 1.0,
        "attributes": { ... },
        "metadata": { ... }
      }
    },
    "signature": "0x..."
  },
  "logs": "Container execution logs...",
  "signed_nonce": "0x1234..."
}
{
"error": "Invalid request"
}Environment Variables in Proof Container
When your proof-of-contribution container runs, it has access to several environment variables:
System Variables
Custom Variables
- All key-value pairs provided in the
env_varsobject of the request - All decrypted secrets from the
secretsobject
Sending Secrets to PoC Container
When your Proof-of-contribution container runs, you may need to access secrets such as API keys, passwords, etc. The Satya nodes accept an env_vars object to send environment variables in plain text, however, this is not suitable for secret values.
To send secrets, encrypt them with the public key below, and send them as a part of the secrets object in the /RunProof request. They will be decrypted and injected into the Proof-of-contribution container as environment variables along with the env_vars. These secrets can only be decrypted by a TEE that's currently registered in the TEE Pool.
# Create the public key

echo "-----BEGIN PUBLIC KEY-----
MIIBojANBgkqhkiG9w0BAQEFAAOCAY8AMIIBigKCAYEA4129oK+dUEalpqP5aT/M
A6yhFbAjNppOidQuVgeSgEPquXLlJrdLoomHGhzugbBYeKS6lceEDM3oygFdCGhT
sly26Ws8qyUIGlk0/JGf4mRHd9RMs0uOF50/mB4abNM/mA/k8cO46+UmXOK2rwEL
U2rPb5tWVzxjPqs8Aw9eT1n7UlvOXxFc4ChyIHX/plfbkKK1R1+PYhtBHeQT8aW1
o7wLsbbnkCGh2iahJaNacMWmUZ9YygdPg2DICQLK2KbZfZHhhylBjDzuBgjUzNai
ikVHzrR6f9eTihYjmpx8Br5Ubhj3lVt45nAXFidxMBe1e7IILNVl9C57sqV+nPFM
2s5ad/r3TDjOZ23e0FGBVsyG+lJwn9q/kx4kjSFsO8fNzJ7wUczVnfW+akox2rMX
rnvdxUhpAAEtJZme5+pnS6Fr4Zi8mUBPt9kC/mHTtbPQoLsX+FeBs/u+rpXe4xBr
+QhqShKWQ+4HzwQHCc5h9d4pqZEKK8UnpdeJ0c/QTqcVAgMBAAE=
-----END PUBLIC KEY-----" > public_key.pem

# Encrypt a sensitive value, ex: "my_password"

echo -n "my_password" | openssl pkeyutl -encrypt -pubin -inkey public_key.pem -pkeyopt rsa_padding_mode:oaep -pkeyopt rsa_oaep_md:sha256 | xxd -p -c 256 | tr -d '\\n'

> 008b24d9c6e4ffc47e3ffa967c09804c7d536d5cf9d4b8a128699917823c9ec4987e82cc71e0bddefc02f273f3b5c48b9ac5238623c3496a865d986542dda00af0f328593243f9369fe1d83cfdadde9da8da319e7b3bb153a5d3d5f41b780def4454e3d4de622d2a60dde568a153d6ad4b7861937a381916786827ada875dc469c2838433d50a6076b1da6af720b696ad452972cc48bec6093738e75e9a49bef3d6f96769c6f1bf14ad2f2115de41133f3043976f2ce257f4cd3f4bafcd597f92bfaa8bf393b038fcdd70fa652bccf45669ac2007689af45c7da91abcb31b326d4d632560cf4857bc1e806c17b33aa6ee6af1f70641f63e487321ddfd6eea9accfac3a72915807a5ff553fc782d823e64f547fff8fb53b9b0022e54e8d78ba6c9973943c2bc491ac0b2020c94f7ae7198451ed295997a8c1e0c7dbe524a0faedd1cadc4149e06d14ecd533262b412def7108cd0dff76e2c00fe7598bb52cdb546afb38962405d5d25a50ff3c377eddf06f056363c41ae870dcb25819b98142e8

# Include the encrypted secret in the POST /RunProof request

...
secrets: {
    password: "008b24d...142e8"
},
...
Updated 4 months ago
