Manual Setup Guide (Advanced)
A detailed, step-by-step guide to the underlying mechanics of setting up a DataDAO.
Strongly Recommended: Use the QuickstartThis guide details the manual steps that are fully automated by the create-datadao CLI tool. For the fastest and most reliable setup, we strongly recommend following our primary DataDAO Creator Quick Start instead.
This manual guide is provided for advanced users who need to heavily customize their deployment or wish to understand the underlying mechanics of the CLI tool.
Introduction
This guide walks you through the minimum steps needed to spin up a working DataDAO on the Moksha Testnet.
Need help or have questions? Join the Vana Builders Discord to get support and connect with other developers.
What You’ll Build
| Component | Purpose |
|---|---|
| VRC-20 Token Contract | Represents dataset value for trading and rewards. |
| DataDAO Contract | Manages data uploads and interactions onchain. |
| Proof-of-Contribution (PoC) | Validates data authenticity using the Satya network. |
| Refiner + Schema | Structures data for querying, ensuring VRC-15 compliance. |
| Contributor UI | A React app for contributing the data. |
Prerequisites
Install and configure these tools. Use Moksha Faucet to cover the gas fees.
Add Vana Testnet to Your Wallet
To use the Vana testnet (Moksha) from the browser, add it to your wallet (see Set Up Your Wallet):
Network Name:  Vana Moksha
RPC URL:       https://rpc.moksha.vana.org
Chain ID:      14800
Currency:      VANA
Explorer:      https://moksha.vanascan.io
Optional: Create a Vana Wallet
For this guide, you'll need a wallet with access to the address, private_key, and public_key to manage your DataDAO.
We recommend creating a fresh wallet to keep things clean and secure, especially since you'll need access to the private_key when deploying contracts.
Most wallet apps like MetaMask and Rabby don't let you export the public key — so we’ll use a simple dev tool to grab all three values upfront.
Quick Wallet Setup
- Go to
- Pick any random key from the list
- Copy the:
- Private key
- Uncompressed public key (second row under "Public Keys" tab)
Save these values somewhere safe — you’ll use them in your .env and when registering your DataDAO.
Testnet Only — Do Not Use in ProductionThis method is for quick testing. For production, use a securely generated wallet from a hardware wallet or trusted EVM-compatible tool. See Set Up Your Wallet.
Import into MetaMask
- Click your account name → Add Account → Private Key
- Paste the private key
Or Import into Rabby
- Click your address → Add New Address → Import Private Key
- Paste the same private key
Once imported, MetaMask or Rabby will automatically detect the wallet from the private key — and you’ll be able to copy the wallet address directly, just like any other wallet.
Your goal in this step is to have access to:
address— your public-facing identity as DataDAO ownerpublic_key— used for signing and verificationprivate_key— required to deploy contracts
Fund Your Wallet with Testnet $VANA
To deploy your DataDAO, you’ll need some testnet $VANA. Here’s how to get it:
- Go to the Vana Faucet
- Paste your
addressinto the input field - Click “Follow us on X” to unlock the faucet
- Pass the CAPTCHA and click “Get 10 $VANA”
You’ll receive 10 $VANA on the Moksha testnet.
Confirm your balance
- Visit moksha.vanascan.io
- Paste your address into the search bar
- Within ~1-2 minutes, you should see your balance update
- Open the “Internal Transactions” tab to view the faucet transfer
TipThe faucet may take up to five minutes to send $VANA to your wallet.
Deploy Smart Contracts
Set up and deploy your DataDAO’s smart contracts on the Moksha Testnet.
Clone and Install
git clone https://github.com/vana-com/vana-smart-contracts.git
cd vana-smart-contracts
git fetch origin main
git checkout main
npm install
cp .env.example .env
Configure .env
.envEdit .env with these required fields:
DEPLOYER_PRIVATE_KEY=...           # Your private_key from the previous step, 62-64 letters
OWNER_ADDRESS=0x...                # Your wallet address from the previous step, 40-42 letter
DLP_NAME=QuickstartDAO             # Name of your DataDAO
DLP_PUBLIC_KEY=045...              # Your wallet public_key from the previous step, 128-132 letters
DLP_TOKEN_NAME=QuickToken          # Token name
DLP_TOKEN_SYMBOL=QTKN              # Token symbol
Security Note
.envfiles contain sensitive keys. Do not commit this file to Git or share it — anyone with access to yourDEPLOYER_PRIVATE_KEYcan take control of your contracts.
Example Values
These examples are for format reference only — do not use them in production.
DEPLOYER_PRIVATE_KEY=48fe86dc5053bf2c6004a24c0965bd2142fe921a074ffe93b440f0ada662d16d
OWNER_ADDRESS=0x18781A2B6B843E0BBe4F491B28139abb6942d785
DLP_PUBLIC_KEY=04920ff366433d60fcebfa9d072d860e6fd7a482e4c055621ef986025076c9fb6418c15712a22bff61a3add75b645345c7c338f19a8ab0d1a3ac6be1be331eac45
You can leave other fields (e.g., DLP_PROOF_INSTRUCTION, DLP_FILE_REWARD_FACTOR) as defaults for testing.
Deploy to Moksha Testnet
The vana-dlp-smart-contracts repo contains many smart contracts used across the Vana ecosystem. You won’t need all of them right now — the DLPDeploy tag deploys only the contracts required to launch your DataDAO.
npx hardhat deploy --network moksha --tags DLPDeployAfter deployment, copy the addresses for your new contracts from the output logs and save them. You will need them later.
Token AddressDataLiquidityPoolProxyVesting Wallet Address

You may see error logs related to contract verification. You can safely ignore those messages - all contracts will be verified onchain.
View Your Contracts on Vanascan
Visit moksha.vanascan.io and search for each of your contract addresses:
- Your token contract shows metadata, total supply, and recent token transfers
- Your
DataLiquidityPoolProxycontract has a rich list of methods viewable in the Contract tab. This is your DataDAO’s main contract. - Your
VestingWalletcontains the vesting schedule and logic for your team's token allocation. Verify them in the Contract tab.
Register DataDAO
Now that you’ve deployed your smart contracts, it’s time to register your DataDAO onchain in the global DLP registry.
Register via DLPRegistryProxy
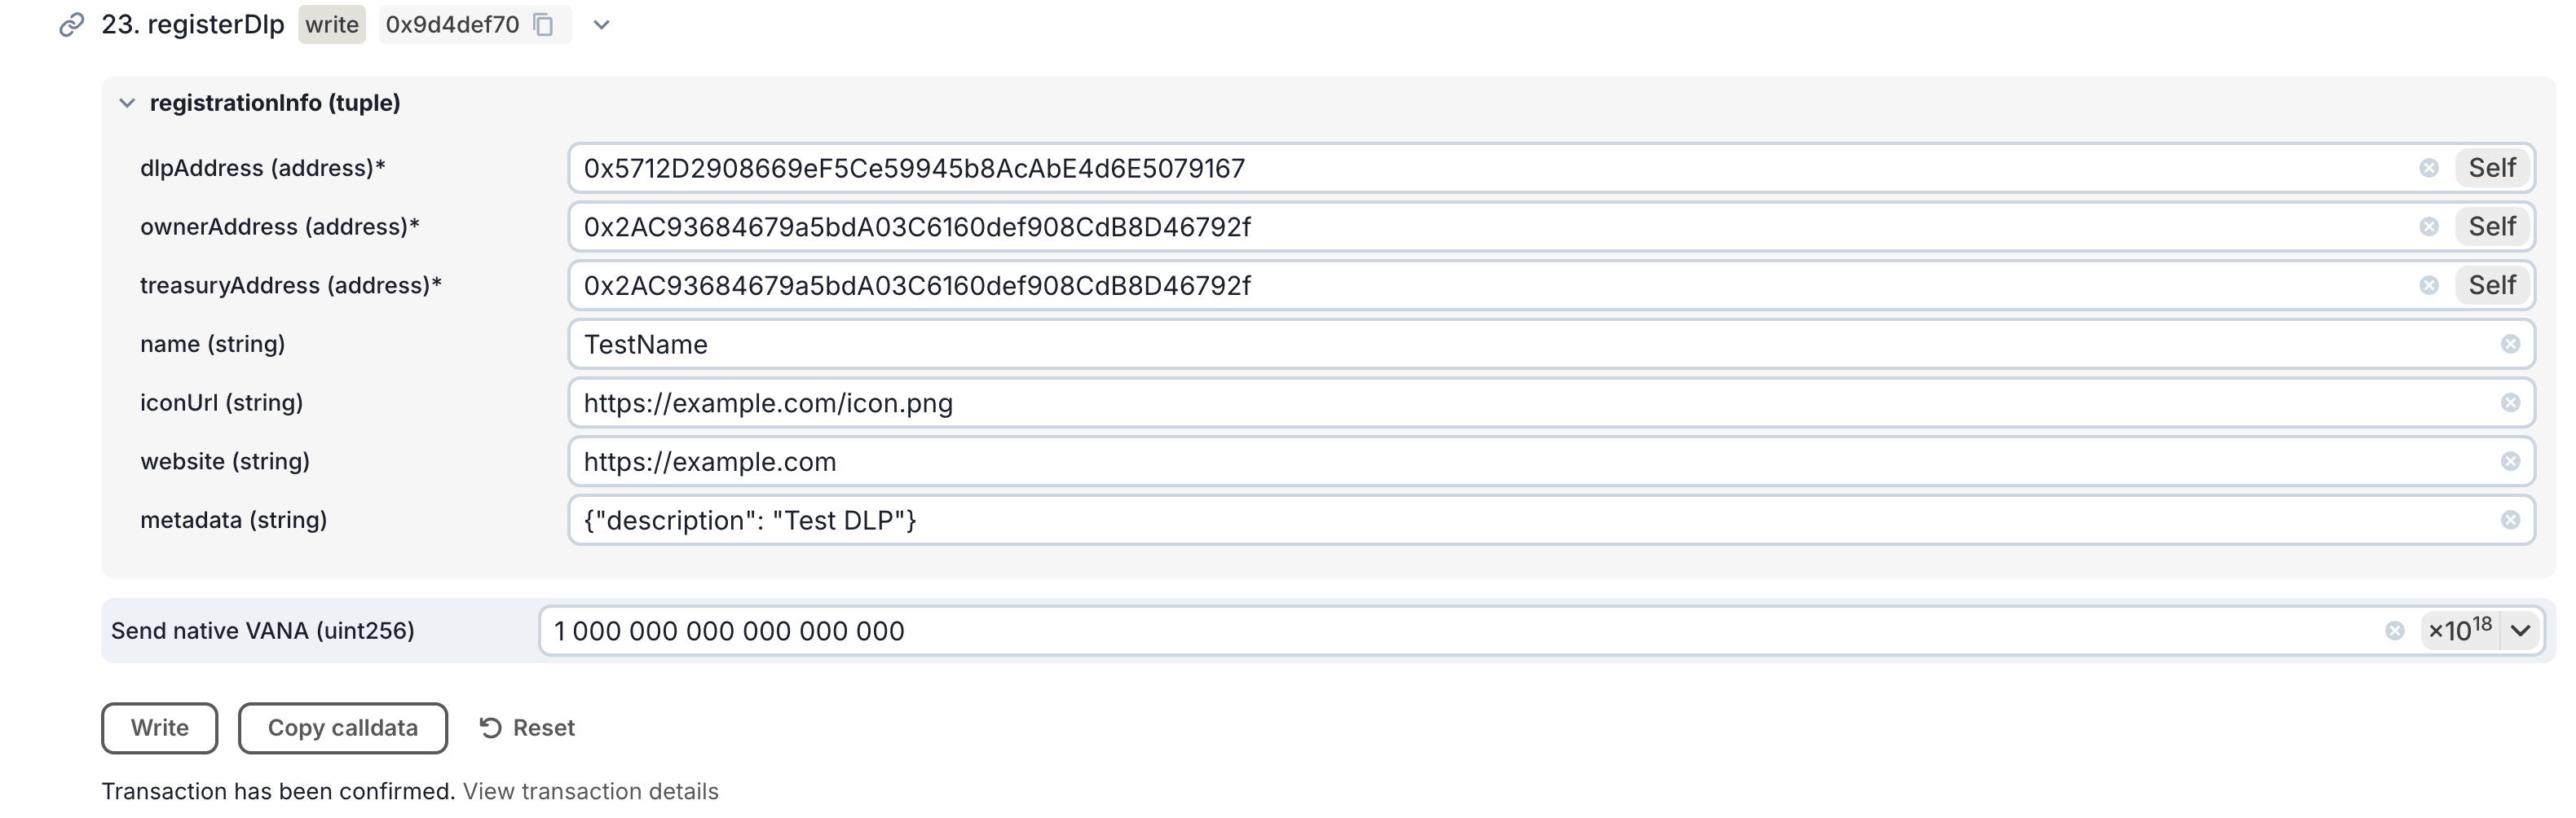
- Navigate to the registerDlp method in DLPRegistryProxy on Vanascan.
- Fill in the
registrationInfofields:dlpAddress: TheDataLiquidityPoolProxyaddress you saved in 1. Deploy Smart Contracts .ownerAddress: Youraddresswallet address, covered in Launch a DataDAO in 30 Minutes.treasuryAddress: A separate wallet that holds DLP’s treasury. It can be the same asownerAddressfor now, but should be a different address on mainnet.name: TheDLP_NAMEname you chose in 1. Deploy Smart Contracts , e.g. "QuickstartDAO".- DLP names need to be unique. If the transaction fails, try again with a different name.
iconUrl— Optional logo URL (e.g.https://example.com/icon.png)website— Optional project link (e.g.https://example.com)metadata— Optional JSON (e.g.{"description": "Test DLP"})
- Fill in
Send native VANA (uint256):- Click the
×10^18button to fill this in with a value of 1 VANA (in wei). A deposit of 1 VANA is required to register your DataDAO.
- Click the
- Connect your wallet (
OWNER_ADDRESS) to Vanascan. Then submit and confirm the transaction.
- Once your transaction confirms successfully, retrieve your
dlpIdwith these steps:- Go to the dlpIds method in the DLPRegistryProxy contract
- Use your
dlpAddressto query your dlpId from the blockchain.

TipYou can update your registration info later using the
updateDlpfunction. All metadata is editable.
Create Proof-of-Contribution Job
Every DataDAO must publish a lightweight script called a Proof of Contribution (PoC) job to ensure that contributed data is valid. Now we will fork the template repository and publish your PoC job as a Docker image.
- Fork the PoC Template
- Fork the template repository in GitHub here.
- Open the Actions tab for your fork and enable GitHub Actions (if prompted).
- In a local terminal in your workspace root, download your fork, replacing YOUR_GITHUB_USERNAME:
git clone https://github.com/YOUR_GITHUB_USERNAME/vana-satya-proof-template-py.git
cd vana-satya-proof-template-py
This repo includes:
my_proof/proof.py: your main proof logicinput/: where encrypted files are mountedoutput/results.json: where your PoC scores are writtenDockerfile: defines your containerrequirements.txt: any dependencies for your logic
- Set Your
dlp_id
Open my_proof/__main__.py and update the load_config()
def load_config():
    return {
        "dlp_id": 1234  # ← replace with your actual DLP_ID
    }
That’s all you need to change for now. The USER_EMAIL will be passed automatically by your application when users upload files — no need to change anything else.
- Change Proof Logic
Open my_proof/proof.py and locate the line that sets self.proof_response.valid.
Replace:
self.proof_response.valid = email_matches and total_score >= score_thresholdWith:
self.proof_response.valid = email_matches
For Testing OnlyThis change loosens the validation criteria to help you QA the full contribution flow in the last guide's step.
It allows contributions to succeed as long as the email matches — even if the data doesn’t meet quality thresholds.
Make sure to update this logic later to reflect your real validation requirements before going live.
- (Optional) Test Locally
To test the job locally with sample data, make sure Docker is running and then run:
docker build -t my-proof .
docker run \
  --rm \
  -v $(pwd)/input:/input \
  -v $(pwd)/output:/output \
  --env [email protected] \
  my-proof
You should get a result like this in output/results.json:
{
  "dlp_id": 1234,
  "valid": true,
  "score": 1.0,
  "authenticity": 0,
  "ownership": 1.0,
  "quality": 1.0,
  "uniqueness": 0,
  "attributes": {
    "total_score": 0.5,
    "score_threshold": 0.04,
    "email_verified": true
  },
  "metadata": {
    "dlp_id": 1234
  }
}
This output is what will later be written onchain when your PoC is executed in production. See Data Ingress in Detail for how it works under the hood.
- Commit Changes
Push your updated PoC to GitHub:
git add .
git commit -m "Set DLP ID for my DataDAO"
git push origin main
Then, go to your GitHub repo → Actions tab, and you’ll see how the build pipeline automatically compiles your PoC into a .tar.gz artifact.
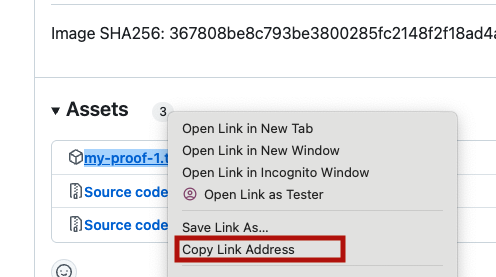
- Get the Artifact URL
Once the GitHub Action completes:
- Navigate to your repo’s Releases section
- You’ll find a
.tar.gzfile — this is your compiled PoC image - Copy the public URL on this file with right click on the link -> "Copy Link Address" and save it for the next step
- Approve Proof Instruction
Now that your PoC is compiled, you need to link it to your DataDAO to ensure only valid contributions get rewarded.
- Go to your
DataLiquidityPoolProxyaddress (from Step 1) on Vanascan (Moksha)- Eg:
https://moksha.vanascan.io/address/<DataLiquidityPoolProxy_Address>
- Eg:
- Open the Contract tab → Find the
updateProofInstructionmethod - Paste the .tar.gz URL you copied from GitHub Releases in the previous step
- Submit the transaction using your
ownerAddresswallet

Create Data Refiner
Now we will define a Refiner for your DataDAO's data. This is a job that will turn each data contribution into a queryable libSQL database, pinned on IPFS, that the Vana Protocol can use. Like Proof-of-Contribution jobs, refiners run in secure compute environments.
- Fork the Data Refinement Template
- Fork the template repository in GitHub here.
- Open the Actions tab for your fork and enable GitHub Actions (if prompted).
- In a local terminal, download your fork, replacing YOUR_GITHUB_USERNAME:
git clone https://github.com/YOUR_GITHUB_USERNAME/vana-data-refinement-template.git
cd vana-data-refinement-template- Get your
REFINEMENT_ENCRYPTION_KEY- Navigate to the dlpPubKeys(dlpId) method on Vanascan.
- Input your
dlpIdthat you saved in 2. Register DataDAO , and copy the returned key for your.env. - If the result is an empty string
"", wait a few minutes and try again. If you still get an empty string after 30 minutes, please open a support ticket in the Vana Builders Discord.
- Get your
PINATA_API_KEYandPINATA_API_SECRET- Go to pinata.cloud and log in.
- In the sidebar, click "API Keys"
- Click "New Key"
- Turn on the Admin toggle, give it a name (e.g.
"test"), and click Create - Copy the generated
API KeyandSecretfor your.env
- Create the
.env
# Get this key from chain (see above)
REFINEMENT_ENCRYPTION_KEY=0x...

# Optional: IPFS pinning for local test (see above)
PINATA_API_KEY=your_key
PINATA_API_SECRET=your_secret
TipThese
.envparameters are only used for local testing — in production, the actual values will be injected automatically when the Contributor UI calls Satya via/refinemethod.You're doing this now to generate and preview the schema your Refiner produces — this is what data consumers will later use to query your DataDAO’s data.
-
Update Schema Metadata
Before running the refinement test, make a quick edit to your schema’s metadata — this is required to trigger the GitHub pipeline.
- Open
refiner/config.py - Edit
SCHEMA_NAMEto something like:"Google Drive Analytics of QuickstartDAO"
- Generate Your Schema
docker build -t refiner .
docker run \
  --rm \
  -v $(pwd)/input:/input \
  -v $(pwd)/output:/output \
  --env-file .env \
  refiner
This will produce two key files in output/:
db.libsql.pgp: the input data refined into a database, encrypted and pinned to IPFSschema.json: table structure for queries
- Upload Your Schema to IPFS
Now we need to make your schema.json accessible to public.
- Go to pinata.cloud and log in
- In the sidebar, click "Files" → "Add" → "File Upload"
- Upload the
schema.jsonfrom your local/outputdirectory - After the upload completes, click on the file and copy it’s URL
You’ll use this in a future step as the schemaDefinitionUrl when registering your Refiner.
- Commit Changes
git add .
git commit -m "Set up refiner for the DataDAO"
git push origin main
Then, go to your GitHub repo → Actions tab, and you’ll see how the build pipeline automatically builds your refiner and compresses it into a .tar.gz artifact.
- Get the Artifact URL
Once the GitHub Action completes:
- Navigate to your repo’s Releases section
- You’ll find a
.tar.gzfile — this is your compiled PoC image - Copy the public URL on this file — you’ll need it for the next step as
refinementInstructionUrl. Save it for later too, you'll need it in the Contributor UI.
- Register the Refiner Onchain
Once registered, your schema becomes part of the Vana data access layer, enabling apps to query refined data with your approval.
- Navigate to the addRefiner method on Vanascan.
- Fill in the fields:
dlpId: yourdlpId, saved from 1. Deploy Smart Contracts (no need to convert from wei with×10^18).name: a label for your Refiner, e.g."Quickstart Refiner".schemaDefinitionUrl: the IPFS URL of your schema from step (5) above.refinementInstructionUrl: the URL to your.tar.gzrefiner file from step (7) above.
- Connect your wallet (same as
OWNER_ADDRESS) - Submit the transaction
- Get Your Refiner ID
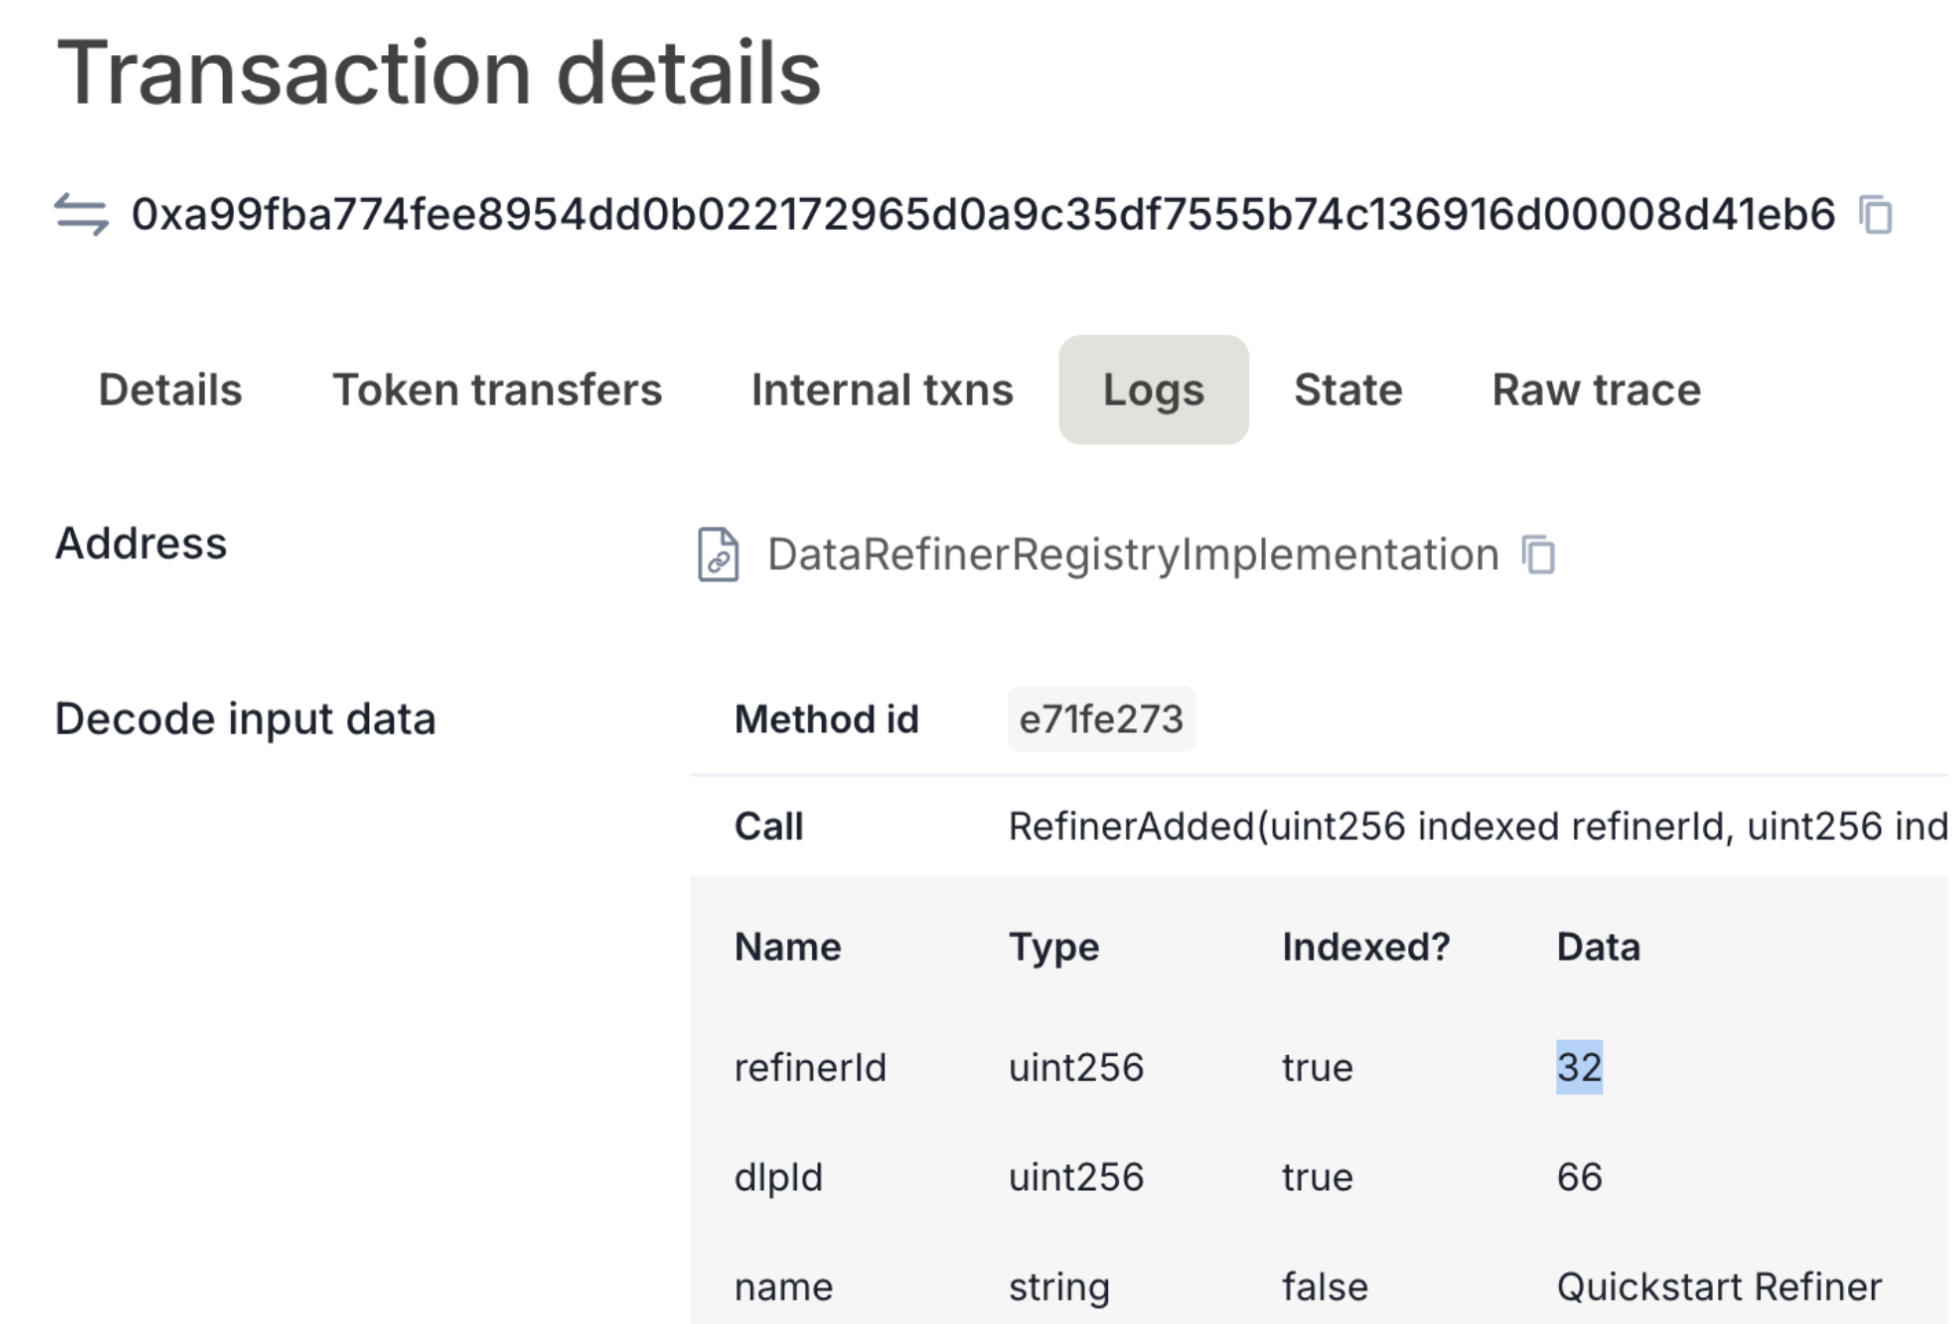
After submitting the addRefiner transaction:
- Open your transaction on Vanascan
- Go to the Logs tab
- Find the
RefinerAddedevent and save yourrefinerIdfor the next section.
At this point, you’ve got everything needed to make your data query-ready on the Vana network.
Launch DataDAO UI
This step gives you a working front-end where users can connect their wallet, sign in with Google, and contribute data to your DataDAO — securely and privately.
The UI handles:
- Client-side encryption of user data
- Google Drive integration for file selection
- Proof-of-Contribution validation through your PoC job
- Schema-compatible refinement through your Refiner
- Onchain submission to the Vana network
UI Setup
- Clone the Template UI Repository
git clone https://github.com/vana-com/dlp-ui-template
cd dlp-ui-template
yarn install
cp .env.example .env- Configure
.env
Update the following values in your .env:
REFINER_ID— saved from 4. Create Data Refiner.NEXT_PUBLIC_PROOF_URL— saved from 3. Create Proof-of-Contribution Job.PINATA_API_KEY/PINATA_API_SECRET— saved from 3. Create Proof-of-Contribution Job.NEXT_PUBLIC_DLP_CONTRACT_ADDRESS—DataLiquidityPoolProxysaved from 1. Deploy Smart Contracts .
- Set Up Google OAuth
- Go to Google Cloud Console
- Click Select a project → New Project to create a new project
- Navigate to the created project → search for Google Drive API and click Enable
- Search for APIs & Services → OAuth consent screen
- Click Get Started, select External as a type, fill required fields
- Go to APIs & Services → Credentials → Click Create Credentials → OAuth Client ID
- Choose Web Application
- Add the following:
- Authorized JavaScript origins:
http://localhost:3000 - Redirect URIs:
http://localhost:3000/api/auth/callback/google
- Authorized JavaScript origins:
- Click Create
- Finally, copy your Client ID and Client Secret, and add to
.env:GOOGLE_CLIENT_ID=...GOOGLE_CLIENT_SECRET=...
TipThese settings restrict OAuth access to localhost only.
When you deploy your UI to the web, make sure to update these values to match your production domain (e.g.
https://your-datadao-ui.com).
- Run the UI
npm run devThen open localhost:3000. You now have a working Contributor UI connected to:
- Your DataDAO onchain
- Your Proof-of-Contribution
- Your Refiner schema
- Google Drive and wallet login
Test the Contributor Flow
Now that everything’s set up, let’s test the full flow from a data contributor’s perspective.
- Open the Contributor UI at localhost:3000.
- Click Sign in with Google and follow subsequent steps to authorize access to your Drive
- Click Connect Wallet → choose any wallet with Moksha testnet support + some testnet $VANA
- Click Contribute Google Data
- The app will:
- Encrypt your data client-side
- Store it in your Google Drive
- Trigger your Proof of Contribution
- Register the result onchain
- Send the data to your refiner for processing
- Track each stage in the UI — from upload to onchain registration and reward confirmation
- To verify tx onchain, search your wallet or DataDAO contract on Vanascan (Moksha)
- Once complete, the data contributor will receive a reward in your VRC-20 token — the token you deployed earlier — directly in their wallet.
🎉 Done
Your DataDAO is now live on the Moksha testnet — you’ve deployed the contracts, registered the DataDAO, wired up PoC and refinement, and confirmed that contributors are rewarded onchain with your VRC-20 token.
What’s Next?
- Customize the UI and dataset structure
- Update PoC logic to enforce your real contribution criteria
- Prepare for Mainnet launch
- Join the Vana Builder Discord to connect with other builders
- Apply to the next round in Vana Academy.
Updated 5 months ago